GreaseMax is a chemically operated automatic lubricator.
It is designed to be screwed into the bearing grease nipple seating, or onto an extension line, and to feed lubricant at a CONSTANT RATE for a SET PERIOD of time.
GreaseMax operation is simple and trouble free. Quite frequently its capabilities are not at first appreciated because of it's simplicity.
Why "Continuous lubrication" is important?
Continuous lubrication provides the best lubrication results for improved bearing life. Re-greasing the motor when it is running allows a more effective, controlled result. Bearing life is improved, there is a reduced possibility of excess grease being applied and contaminating the motor internals, and the problems of the wrong grease being used, foreign matter contamination from dirty grease nipples or lubrication being missed are eliminated.
Continuous lubrication provides the best lubrication results for improved bearing life. Re-greasing the motor when it is running allows a more effective, controlled result. Bearing life is improved, there is a reduced possibility of excess grease being applied and contaminating the motor internals, and the problems of the wrong grease being used, foreign matter contamination from dirty grease nipples or lubrication being missed are eliminated.
NO EXTERNAL POWER NEEDED!!
NO BATTERY, NO ELECTRICAL, NO SPRING, NO TIMING....
DISPENSE BASE ON DEMAND
100% AUTOMATIC.....!!!
*THE DISCHARGE TIME & THE DISCHARGE RATE OF GREASE MAX WILL OF COURSE DEPEND UPON THE AVERAGE AMBIENT ENVIRONMENTAL TEMPERATURE.
4. INSTALLATION 4.1 GreaseMax discharge rates 4.2 Output pressure of GreaseMax 4.3 Affect of bearing and grease way pressure 4.4 Installation with extension lines 4.5 Oil units
5. CHANGING GREASEMAX
6. LUBRICANTS
7. IDENTIFICATION OF GREASEMAX
8. WHICH GREASEMAX SHOULD BE USED?
9. SHELF LIFE
10. SAFETY
11. THE ENVIRONMENT & DISPOSAL
12. QUALITY
13. COMMON QUESTIONS ASKED ABOUT GREASEMAX
GreaseMax is a chemically operated automatic lubricator.
It is designed to be screwed into the bearing grease nipple seating, or onto an extension line, and to feed lubricant at a CONSTANT RATE for a SET PERIOD of time.
GreaseMax is designed to operate for a set period of time. There are 5 operating periods; 1, 3, 6, and 12 months. After the service time has elapsed, the unit is replaced with a new unit.
Because it is self regulating it should be used in conjunction with the plant maintenance scheduling. Therefore changeovers of the GreaseMax can be planned and carried out at set periods.
GreaseMax operation is simple and trouble free. Quite frequently its capabilities are not at first appreciated because of it's simplicity.
GreaseMax can be used anywhere; on most applications, both large and small, even underwater.
Importantly, GreaseMax has no electrical or mechanical components and has only one moving part, which is the piston. For this reason GreaseMax is extremely reliable.
2.1 Cost savings:
• Direct cost savings over manual greasing. • Direct cost savings by reducing the necessity to stop machinery and production for lubrication. • Indirect cost saving with reduced maintenance and down time from bearing failures caused by incorrect or missed lubrication.
2.2 Maintenance advantages
• Lubrication occurs when the plant is in operation, when it is of the most benefit. • Constant replenishment of new grease, which minimises bearing wear. • The bearing is sealed while GreaseMax is in use. • Dust and moisture are prevented from entering the bearing. • The lubrication is fully automated and changeovers can be programmed into the plant maintenance schedule. • GreaseMax ensures that as a warm or hot bearing cools, the slight vacuum normally created does not draw in foreign material. • A continuous supply of fresh lubricant flushes out any foreign matter, moisture or harmful chemical substances which may otherwise accumulate in the bearing if it is unused for some time. • A constant grease supply ensures that seals are lubricated and more effective in preventing contamination. This is particularly the case with labyrinth seals. • GreaseMax change-overs can be programmed with plant maintenance schedules
• Problems of manual lubrication • excess lubrication • insufficient lubrication • application of incorrect lubricant are overcome
• The main problems causing lubrication related failure in ball and roller bearings are overcome: • solid contamination 20% • unsuitable lubricant 20% • insufficient lubricant 15% • liquid contamination 5% • aged lubricant 20% • other causes 20%
• Lubrication is cleaner and environmentally responsible; there is no excess lubricant affecting either plant cleanliness or the environment. • Safety is improved as operators are not required to lubricate hazardous areas 2.4 Design
• GreaseMax has no electrical or mechanical components (which can contribute to unreliability).
• GreaseMax has a steel body ensuring that it efficiently handles high output pressures and heat with total reliability.
• GreaseMax has the highest output pressure of any product of this type.
GreaseMax is activated by screwing in the colour coded plastic starter cap. The colour coding of this cap should match the colour coding of the plastic activating screw in the base of GreaseMax, (into which this cap is screwed).
When the starter cap is screwed in, a controlling element located internally in GreaseMax is forced into a reagent, contained in a neoprene expansion diaphragm. When this occurs a galvanic reaction commences, and gas is produced. The gas expands the diaphragm and as it does so a steel piston (located between the diaphragm and the lubricant) is pushed down and the lubricant is forced out.
GreaseMax requires a minimum of approximately 8 hours for a type 1 unit to approximately 40 hours for a type 12 unit to develop sufficient internal pressure to commence discharging lubricant. This period is normally not a problem for well maintained bearings however if lubrication is required in less than the start up period then activate GreaseMax in advance.
GreaseMax has NO INTERNAL PRESSURE prior to activation. Pressure is developed, and the lubricant discharge pressure is virtually in equilibrium with bearing or grease line resistance.
The chemical reaction is so designed as to give a CONSTANT rate of reaction, over the whole life of the unit. This results in a CONSTANT lubricant output. The GreaseMax discharge rate is not affected by bearing or seal condition, movement, vibration, etc.
It is often assumed that GreaseMax has some sort of pre-loaded internal pressure. This is NOT the case. If it were, GreaseMax could not operate as a truly self regulating automatic lubricator as it would then rely on bearing and line resistance to control its operation.
The starter caps are colour coded. Ensure that the colour of the starter cap matches the colour of the activator screw in the base of the GreaseMax, into which the starter cap will be screwed.
Screw the starter cap in hand tight. (While the starter cap is being turned down, the seals will be heard to break. Continue to turn the starter cap in until it is tight).
Then use a screw driver or similar with a shank size of 8mm - 10mm to tighten the cap FIRMLY (approximately 1/4 of a turn more). This is essential to ensure a gas and liquid tight seal.
Do not loosen the starter cap or attempt to remove it.
When this has occurred GreaseMax is operational. Allow the following minimum starting times: 1 month units - 8 hours, 3 month units - 24 hours, 6 month units - 30 hours, 12 month units - 40 hours, for lubricant discharge to commence. (see "Operation of GreaseMax").
Pre grease with a grease gun before the first installation. The short time delay will not adversely affect bearings which have been properly pre greased before the installation of GreaseMax. For subsequent installations, pre greasing is not necessary as prior use of GreaseMax will have ensured that there is adequate grease in the bearings.
Pre-greasing before the first installation of GreaseMax is also important to ensure that all grease ways are free of old hard grease which can block completely the grease ways. GreaseMax is designed to operate in most conditions. It will operate satisfactorily in:
• Areas of severe vibration. (If this includes high shock loading, to prevent long term failure of the plastic mounting points, use mounting brackets and flexible feed lines, supplied by DIS. • Underwater or wet installations. • GreaseMax is not affected by large daily temperature cycles which can cause condensation problems with some types of equipment. • Heat and cold (see discharge table below for discharge rate variations) • GreaseMax units with grease may be mounted in any position. Movement is OK but brackets may be required to support the unit. For oil filled units see section 4.5.
4.1 GreaseMax discharge rates
• GreaseMax is designed to operate at an average environmental temperature of 250C. The discharge rates and operating period of GreaseMax will be different if the average temperature is different. The following tables gives details.
*click to enlarge.
Note: The average environmental temperature is the average temperature that occurs over the whole life of the unit.
Temperature variations above or below 250C over a short period of time will have little or no affect on the overall life of GreaseMax. For example, periods of exceptionally hot or cold days.
4.2 Output pressure of GreaseMax
GreaseMax can develop a maximum discharge pressure of approximately 150 psi. In practice, the operating pressure is much lower than this as the pressure required to move grease into a rotating bearing, with the grease nipple removed, is not great. GreaseMax holds the output pressure virtually in equilibrium with grease way resistance. A grease gun needs high pressure, principally to overcome the resistance of the grease nipple. It also has to get grease into a stationary bearing, which can require a lot of pressure in some instances. GreaseMax has enough pressure to move grease through 2 metres of extension line. See below for details. 4.3 Affect of bearing and grease way pressure
GreaseMax builds up discharge pressure to the point where fundamentally a balance exists between the resistance of the grease way and the output pressure of the GreaseMax. For example, if GreaseMax is activated and allowed to discharge without being placed on a bearing, the full operating period will be taken before the unit is empty. If GreaseMax is activated and placed on a grease-way requiring pressure GreaseMax will build up to this pressure and then discharge according to its’ normal operating period. GreaseMax adjusts to grease way resistance, but does not rely on this resistance to control its' operation. GreaseMax will maintain the pressure balance. If something occurs to change the grease way resistance then GreaseMax will automatically adjust its' discharge pressure to accommodate this change. 4.4 Installation with extension lines GreaseMax may be used with extension lines supplied by DIS for remote positioning. Extension lines are also useful for installations where extreme movement or shock loadings may be applied to the GreaseMax. In this case, mount the GreaseMax firmly in a bracket (which DIS can supply) and feed the lubricant into the bearing via tubing.
Note: It is possible to install GreaseMax on longer feed lines than the above. For proposed installations outside these limits consult DIS for specialist advice.
All extension lines MUST be pre-filled with lubricant. We recommend only nylon extension lines, so that the condition of the lubricant can always be observed.
4.5 Oil units GreaseMax can be used with a variety of oils for lubrication of bushes, slides, chains, conveyors, -for example to lubricate the undersides of steel slat type conveyors used in applications such as bottle manufacturing and so on.
GreaseMax oil units should be mounted with the outlet upwards or preferably used with a control valve (Part Number GF16000) to prevent the oil draining out if the outlet is downwards or if the GreaseMax oil unit is feeding an extension line, particularly if the extension line feeds vertically upwards.
Chain lubrication: GreaseMax can efficiently and economically lubricate chains of all types. You will need to use 115 oil which has special tacky additives for use on chains, slides etc. and some fittings: a control valve, a bracket, a brush and possibly a flexible extension line. A full list of GreaseMax product codes and fittings is on the Fittings page.
Ideally GreaseMax should be used in conjunction with the plant maintenance schedule. This minimises the time taken for lubrication and ensures that an orderly change over of expired units takes place.
GreaseMax are designed to have a small service life overrun to prevent damage to bearings if the changeover date is not accurately kept. For example, a type 3 unit, at normal temperature, will operate for 100 days, which is of course 9 days more than the 91 day average for 3 consecutive months.
We recommend that time is not spent checking for the piston to appear in the cone of the unit after expiry of the scheduled time. It is far more economical to change the units on a fixed schedule, even if a small amount of grease remains. In any event the costs and savings are calculated on set time periods, and the cost in time of attempting to exceed these periods with the resulting requirement for very regular checking is more than the value of the small amount of lubricant remaining.
GreaseMax is designed so that the piston will first become visible as a silver ring in the plastic end cone when there is approximately 10% of lubricant remaining. This is to give a visual forward warning of expiry. GreaseMax will continue to operate until all lubricant is expelled. At this point all of the piston is visible.
Caution: When using Moly grease in GreaseMax the piston may not be visible at expiry. (This is due to the opacity of the grease).
GreaseMax uses only very high grade lubricants chosen for their performance and suitability for use in GreaseMax.
A full range of greases and oils is available to cover all applications. Delta is able to assist customers with special lubrication requirements.
GreaseMax standard lubricants:
Full lubricant specification sheets are available on request.
An identification code for the grease type and production batch is impressed into the GreaseMax label. The activating cap is colour coded according to the operating period.
Lubricant type: GreaseMax has a 3 digit numeric code, which corresponds with the lubricant code (see table above).
The other 2 letter group is a production code (month and year as mmyy).
Operating Period: The GreaseMax activator screw (in the base of the
There are no hard and fast rules for selecting the type of GreaseMax to be used on any given application. Every bearing is different, the variety of operating conditions is unlimited and other factors need to be taken into account such as wear, seal condition, moisture presence, heat, etc. However the following can be taken as a guide:
• For shaft sizes greater than 160mm, use one or more GreaseMax coupled together. • If moisture, severe dirt or dust, wear, heavy vibration or other factors are present, consideration should be given to using a quicker acting GreaseMax.
Additionally, the following "rule of thumb" may prove helpful:
In terms of strokes per day from a small hand grease gun, output approx. 0.6cc per stroke, the GreaseMax discharge is roughly equivalent to:
GreaseMax and the lubricants used in it have a shelf life of 2 years. The units should be installed within this period to ensure optimum performance. A date of manufacture appears on the side of GreaseMax as a 4 digit number representing month and year as mmyy.
GreaseMax will improve plant personnel safety by reducing the need to visit hazardous plant and equipment to lubricate. When properly installed, it is possible to change GreaseMax without stopping moving machinery, saving on down time.
GreaseMax, made in Germany, is a safe product. Both the production and the GreaseMax unit have safety certification from the German and world wide TüV safety organisation. The following TüV certification symbols are licenced for use on GreaseMax:
GreaseMax has been tested as required by all the relevant statutory German Safety Authorities and approved for both manufacturing and mining, including underground coal mining, without restriction. Further details are available on request.
GreaseMax uses a small quantity of 28% solution of potassium hydroxide as part of its operation. For this reason it is important that the activating cap is not loosened or removed after the GreaseMax is placed in service. The screw cap is designed to prevent liquid under pressure exiting the unit. If this does occur wash any affected skin areas with water and refer to the MSDS. Note that it is not possible for the liquid to escape unless the unit is deliberately cut open or opened as above. Internally the steel piston has rubber seals so that in the unlikely event that the neoprene diaphragm is damaged the liquid cannot escape into the lubricant .
GreaseMax is designed to partially release the plastic cone from the metal body when discharge pressure exceeds 150 psi. This is to prevent continued pressure build up to dangerous levels.
Should a GreaseMax be observed in this state immediate maintenance is required as this situation is generally caused by blockages of the grease ways by old grease.
Expired GreaseMax should placed in the industrial waste or recycled. Pressure is retained for a period after the service life is completed and this, combined with good housekeeping, means they should not be left lying around. GreaseMax does not contain any item which precludes burial in land fill either according to law or according to good environmental practice. They may be recycled but the method should be chosen with care as GreaseMax should not be opened because of the residual pressure that remains for a period after expiry and as they contain a small quantity of caustic solution.
GreaseMax is manufactured to the highest quality standards. The manufacturer as well as Delta is committed to providing the best product of this type together with the best technical support and training of personnel. As part of this commitment we will not introduce any element into the design of GreaseMax which can contribute to unreliability, such as electrical or mechanical components, plastic bodies, or by reducing components or using cheaper material including lubricants, to save on production costs.
1 How do I know GreaseMax is working, when the position of the piston can't be seen?
Firstly, remember that GreaseMax has only one moving part, (the piston), no mechanical parts, and no electrics. It uses an operating system proven to be absolutely reliable over 25 years. The manufacturer has stringent quality control to ISO9001 standard. It is very unlikely that non performance will be encountered.
The GreaseMax design is fail safe; the starter cap cannot be screwed in without turning the activator screw down, which in turn can only break the seals and release the controlling element into the chemicals. The only possible result then is the production of gas which must push the piston forward and the lubricant out. The gas is retained in a gas tight neoprene bag and also as part of the fail safe design by the gas tight seals on the piston and the double O-rings on the starter cap. However, to be assured, check the following: • Simply feel the bearing temperature if safe to do so, or use a thermometer. • A fresh discharge of grease around the seals will be visible when GreaseMax is operating.
2 If I have a worn bearing will GreaseMax discharge faster?
No, definitely not. GreaseMax is self regulating and is a true automatic lubricator. It will maintain it's correct discharge rate regardless of the bearing type, tolerance or operating conditions.
3 Does the orifice size affect the discharge rate?
No. See page 3, Operation of GreaseMax.
4 Is a 12 month GreaseMax larger than a 1 month?
No, they are all the same size. The only difference is the discharge rates. (see the diagram and notes on page 3).
5 The plant is regularly stopped, for example at the week end. Will this create a problem with over greasing?
No. GreaseMax discharges at a very slow controlled rate and the amount of grease it can push into a bearing while the bearing is stopped for a few days will not a cause a problem.
GreaseMax is able to maintain a fine balance of pressure and if the plant is stopped for short periods, for instance at the week end, the resistance of the grease way is increased. This will temporarily stop GreaseMax. When the plant starts again, the grease will be released into the moving bearing. (Eventually GreaseMax would build enough pressure to move grease into the stopped bearing).
6 Will the 120 grams of grease in the GreaseMax be enough?
When greasing is done with a grease gun, excess grease is used. Only a very small amount of grease is actually used by a bearing, the rest is wasted. Because GreaseMax introduces grease into the bearing at a slow controlled rate while the bearing is moving only a small output quantity is required.
Providing the correct GreaseMax is chosen to begin with, the output will be sufficient. An additional benefit is that the plant will remain much cleaner!
7 For our application, GreaseMax output is not sufficient, even with a 1 month unit.
Several GreaseMax can be grouped together into one line to provide a higher feed rate.
8 Can we use one GreaseMax to feed two or more lines?
No, never. The discharge cannot be evenly split, as every bearing has a different grease resistance. Inevitably one bearing will be starved of grease.
9 We took the unit off and nothing came out! This is the most common "complaint" or misunderstanding with this product.
GreaseMax will only show a large and obvious discharge if it has been used on a bearing with a reasonable amount of grease way resistance.
If GreaseMax is applied to a bearing with little or no grease way resistance (which is common) and GreaseMax is unscrewed, nothing should come out, except at A VERY SLOW RATE. Remember, GreaseMax operates in equilibrium with resistance.
This situation has confused many people so far, especially if they have removed the product from one bearing which has some resistance, seen the resulting discharge, and then removed another GreaseMax from a similar neighbouring bearing, which has no resistance and which therefore will not show an immediate discharge.
10 Why shouldn't GreaseMax be removed from the bearing during operation? If GreaseMax is operating under a lot of pressure, when removed this pressure will be lost.
The unit may have been at say, half life, so the piston will be halfway down the cylinder. The chemical reaction which produces the pressure is very slow and to re-pressurise up to the required pressure the second time may take a considerable period. Under-lubrication during this period may result.
(Note: when first installed there is no problem with the time taken to accumulate pressure as the internal volume in the expansion diaphragm is fully taken up with liquid so pressure develops quickly).
11 Why doesn't GreaseMax have a transparent body?
GreaseMax has a steel body for a very good reason. Steel does not deform under the heat and pressure likely to be encountered when using GreaseMax in some applications. Plastic does. If this were to occur, GreaseMax would suffer failure.
The disadvantage of course is that the progress of the piston can’t be seen but the advantages in terms of the performance and reliability of the unit far outweigh the disadvantages.
12 We think it is better to manually inspect the bearings while greasing
As will be apparent, the time spent on manual greasing can be used more efficiently and the expense applied to a better maintenance outcome. If inspections are required they are better done by qualified personnel as part of a Condition Monitoring program. If the bearings are correctly lubricated and then correctly inspected, (which need only be at relatively extended intervals), bearing life will be considerably improved. Maintenance costs will be greatly reduced and the costs of unscheduled production stoppages in terms of lost production and unscheduled maintenance will be lowered.
13 Why isn’t GreaseMax adjustable?
GreaseMax is made to be completely reliable in all conditions. We prefer not to compromise with any design aspect but particularly this one. To make it adjustable would mean added complexity and the addition of electrical components. This would inevitably degrade the reliability factor.
http://www.machinerylubrication.com/Read/749/electric-motor-regreasing Rolling element bearings used in electric motors have many failure causes such as incorrect bearing selection, improper bearing fits, poor handling during installation, improper installation techniques, excessive thrust loads, loss of lubricant, contamination and overgreasing.
Grease volume control has been a long-standing problem for industry, and simply following OEM recommendations may not be enough to solve this problem.
A motor relubrication practice was developed by the Electric Power Research Institute (EPRI) in 1992 and is widely used by the nuclear power industry today. The program was designed to minimize overgreasing motor bearings in-between required bearing replacements. The relubrication program, associated retrofits and details are discussed in this article.
Background The problem of overgreasing electric motors was first identified in the nuclear power industry in 1988. Several motor and/or bearing failures occurred at various nuclear power plants due to excessive grease addition. In 1992, EPRI’s Nuclear Maintenance Application Center developed an electric motor predictive and preventive maintenance guide. This guide, outlined a complete maintenance program for various electric motors based on size and bearing type. Part of this maintenance program offered guidance on regreasing motor bearings. This program has helped utilities save money by reducing labor cost for regreasing and reducing bearing failures due to overgreasing.
Bearing Housing Designs There are two basic bearing housing designs used in most motors with regreasable rolling element bearings.
More motors are manufactured with a same-side design (Figure 2) than a flow-through design (Figure 1). Figure 2 shows the drain plug is the only external path for the grease to exit the grease cavity.
Figure 1. Flow-through design - used only with open face bearings.
Figure 2. Same-side fill and drain – used with open, single-shielded, and double-shielded bearings.
Four Basic Bearing Types
Open Face Bearing – This bearing consists of the inner and outer race, the balls and the ball cage. It does not retain grease within shields and requires a grease cavity around it for lubrication.
Single-shielded Bearing – This bearing has a metallic shield on one side only, and is usually installed with the shield facing the motor winding. It can be regreased and typically has the same regreasing intervals as an open face bearing.
Double-shielded Bearing – This type has a metallic shield on both sides of the bearing and is designed to retain grease between the shields. There is a small air gap between the shields and the inner race which allows a certain amount of oil transfer over a long period of time between the grease in the grease cavity and the grease between the shields. There is some debate whether this type of bearing can be regreased. Regreasing double-shielded bearings has been successful and this article provides guidance for those who choose to place double-shielded bearings in a regreasing program.
Sealed Bearings – These bearings are designed similar to a double-shielded bearing with one exception. The inner race slides against the seals resulting in the absence of an air gap between the seals and the inner race. This type of bearing cannot be regreased.
Grease-related Bearing Failures There are several types of grease-related bearing failures:
Lubricant starvation – Occurs when the grease cavity is not packed with the proper amount of grease during bearing installation, when the bearing is not regreased at the appropriate interval with the proper amount or when the oil is removed from the base of the grease by bearing overheating.
Grease incompatibility – Greases are made with different base compounds such as lithium or polyurea. Not all greases are compatible with each other; therefore it is important to use the same grease or compatible substitute throughout the life of the bearing.
Wrong grease – It is important to use the correct grease for the correct application. Some bearing designs and applications need only general purpose (GP) grease while others need extreme pressure grease (EP). Selecting or regreasing with the wrong grease can lead to premature bearing failure.
Overpressurization of the bearing shields – When grease is added to a grease cavity, grease volume and cavity pressure increase. Damage can occur to the shield on a single- or double-shielded bearing during regreasing if the grease is added too fast. When the motor is placed into service, the grease will thermally expand. If the grease cavity is full, thermal expansion can create damaging pressure on the bearing shields. In either case, the shields can be dislodged from the bearing or the outside shield can be pushed against the bearing cage by grease pressure, which can lead to a bearing failure (Figures 6 and 7).
Figure 6. Overgreasing Failure
Figure 7. Shield was pressurized by excessive grease which caused a cage failure.
Inside of motor full of grease – If the grease cavity is full and regreasing continues, the excess grease can find its way between the inner bearing cap and the shaft and flow to the inside of the motor. This allows the grease to cover the end windings of the insulation system and can cause both winding insulation and bearing failures (Figure 8).
Figure 8. Overgreasing caused inside of motor to fill with grease.
Overheating due to excess grease – The balls of a bearing act as tiny viscosity pumps which roll on a small amount of oil film between the balls and the race. Too much volume will cause the elements to churn the grease, resulting in parasitic energy losses and high operating temperatures, which in turn increase risk of bearing failure.
Hardware to Limit Overgreasing and Overpressurization of Bearing Cavities One thing that happens with adding grease to motors is that there is a limited path for excess grease to exit a bearing cavity. Two examples of hardware that can assist in limiting overgreasing and overpressurization of a bearing cavity are shown in Figures 9 and 10. The use of these fittings can eliminate the need to remove the drain plug for excess grease and pressure release during the regreasing activity.
The fittings shown in Figures 9 and 10 are commercially available from Alemite and have been used successfully in the nuclear power industry.
Figure 9. The pressure cut-off-fill-plug does not allow additional grease to be added to a grease cavity when the pressure exceeds 20 psi. (Left) Figure 10. The plunger drain plug opens the center plunger on 1 to 5 psi to purge excess grease and pressure. (Right)
Grease Degradation Grease degradation is a gradual process. Most grease degrading influences are more present only while the motor is running; however degradation can occur while a motor is idle. Grease degradation can be caused by any of the following conditions:
Grease hardening – This usually results from absorption of dirt, moisture or oxidation over a long period of time.
Chemical breakdown – Typically caused by excessive heat. Overgreasing can cause overheating.
High bearing loads – Side-loaded motors can load a bearing system more than a direct coupled motor.
Oil separation from grease base material – This occurs on motors that remain idle for long periods of time, when the grease is churned excessively, and over time due to the designed normal bleed rate.
Rotational speed of the bearing – The higher the speed, the more grease will degrade.
Bearing size – The larger the bearing, the more grease degradation can occur. The size of the bearing can usually be equated to the horsepower of the motor.
Environment – Bearings operating in ambient temperature above 140°F can cause more rapid degradation of the grease.
Regreasing Program Clearly, several factors must be considered to develop a sound regreasing program for all of the motors in a plant.
Verify the type of bearings installed in both the inboard and outboard ends. This will determine if the bearings are regreasable.
Verify the initial grease fill of the grease cavity to ensure available space for future regreasing.
Identify the grease type (GP, EP, synthetic, etc.) and the manufacturer if possible.
Make grease fittings accessible, both fill and drain fittings.
Establish cleanliness around the fill and drain fittings.
Identify an owner of the program. If there is no owner, then a successful program is unlikely.
Regreasing Techniques How Should the Grease Be Added? Because the bearing balls act as tiny viscosity pumps, and the grease is less viscous when hot, a bearing should be regreased while the motor is running. If this is not practical, then perform regreasing immediately after the motor is removed from service while the grease is still hot. Although no program eliminates overgreasing an already filled grease cavity, the steps listed below will help minimize overgreasing-related failures.
The following steps should be performed in the sequence listed:
Ensure the grease gun contains the appropriate lubricant for the bearings to be regreased.
Clean the areas around the fill and drain fittings.
Remove the drain fitting and if possible, run a spiral bottle brush into the grease cavity and remove a small amount of grease to form an exit path. If the plunger-type drain plugs are used, this step can be eliminated.
Grease the bearing with the proper amount of grease. Add grease slowly to minimize excessive pressure buildup in the grease cavity.
If regreasing is performed with the motor out of service, operate the motor until bearing temperature stabilizes to allow thermal expansion of the grease. Ensure the drain plug is left out during this run unless the plunger-type is used.
After excessive grease has been purged, reinstall the drain plug and clean excessive grease from the drain area.
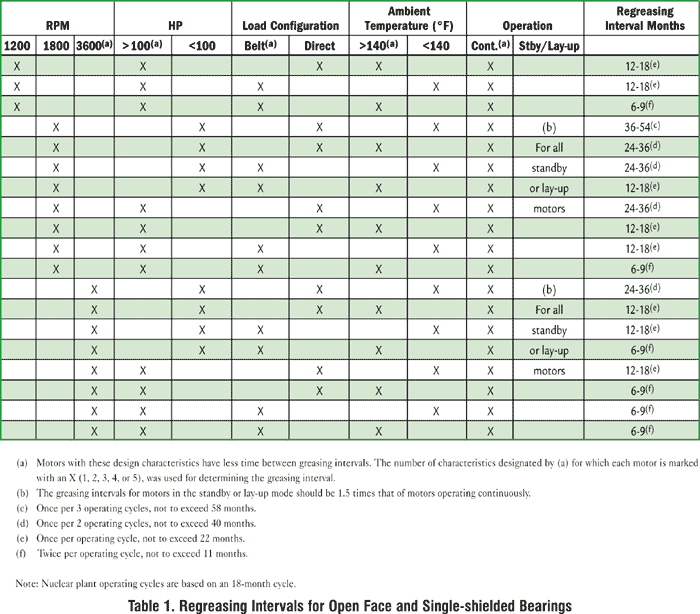
How Often Should Bearings be Regreased? The program presented in this article and listed in EPRI NP-7502 Report is based on the following information about the motor design and operation:
Continuous operation
Intermittent operation
Standby or lay-up
Open face, single-shielded or double-shielded bearing (inboard and outboard). Different types can be used for the inboard and outboard bearings. Note: Sealed bearings cannot be regreased.
Ambient temperature - less than 140°F and greater than 140°F
Table 1 was designed for a relatively clean nuclear plant environment. A dirty or contaminated environment may require adjustments to the recommended intervals.
For intermittent duty cycle motors, the greasing intervals should be the same time frame as continuous duty cycle motors measured by their operation time, not calendar days.
For example, if an intermittent duty cycle motor runs 50 percent of the time and meets the same characteristics in the table as a continuous duty cycle motor that has a 24 - to 36-month regreasing interval, then the intermittent duty cycle motor’s regreasing interval will be 48 to 72 months.
Because there is still some debate whether or not a double-shielded bearing can be regreased, the double-shielded bearing column was not included on the table in the EPRI report. However, for double-shielded bearings, it is recommended to double the frequency in the table and halve the amount added shown on the grease fill chart.
It is worth noting that this regreasing program was designed to minimize overgreasing of bearings in between bearing replacement. When a bearing is replaced, not only should the bearing be packed (open and single-shielded bearings), but the grease cavity is filled with grease to around 50 percent fill, leaving additional space for regreasing. The grease should be added to the grease cavity in such a way as to provide grease around 360 degrees of the cavity. It should also be added in such a way as to allow the grease to come in contact with the bearing. If the grease is packed only in the bottom of the grease cavity, no contact will occur between the grease and the bearing.
For bearing configurations that have their open side toward the bearing cavity, no grease contact would allow the bearing to sling out the grease packed around the balls and cause a lubricant starvation issue and possible bearing failure. Once the grease cavity fills, any excess grease must vent through the designated vent port, or will be pushed into the motor. Unfortunately, due to frequent inaccessibility to the vent port after motor installation, this often does not happen. Overgreasing can lead to bearing shield deformation, cage failure, overheated bearing or filling the inside of the motor with excess grease.
How Much Grease Should be Added? This is another area in which different manufacturers give differing recommendations. However, to provide guidance on the amount of grease to be added for different size motors, a grease weight versus shaft diameter curve was determined to provide the most useful information (Figure 11).
Figure 11. Grease Fill Curve
For ease of plant implementation, the number of ounces of grease should be converted into strokes for each different type grease gun used, or a calibrated grease meter can be attached to the output of a grease gun.
For motors in standby or lay-up mode and double-shielded bearings, the ounces of grease identified by the above curve for any given motor should be divided by two and that value should be used for the amount added.
The development of a regreasing program that will work for all motors requires ownership by someone familiar with motor designs, operating conditions, history of bearing replacements and type of grease used. Once the program is developed, it can be implemented by simply following procedures. This program has proven to be effective in providing adequate lubrication during the bearing life. It has also minimized bearing failures from overgreasing. Many of the nuclear power plants in the U.S. have implemented this program for motor relubrication since the EPRI report was published in 1992.
Editor’s Note: This article was published in the Lubrication Excellence 2004 Conference Proceedings. April 2004, Noria Corporation.
References:
NRC Information Notice No. 88-12, “Overgreasing of Electric Motor Bearings,” NER 880492.
EPRI Report No. NP-7502. “Electric Motor Predictive and Preventive Maintenance Guide,” 1992.
EPRI, Power Plant Electrical Reference Series, EL-5036, Volume 6, Motors.
SKF Bearing Maintenance Institute Manual. (This manual is obtainable only by attending SKF bearing maintenance seminar.)
American Bearing Manufacturer Association (ABMA) Standards Nos. 1, 1984 and 9, 1978.
American Bearing Manufacturer Association.
General Electric. Guide for Relubrication and Relubrication Intervals for Grease-lubricated Ball and Roller Bearing Motors. (B-19).
FAFNIR, TEXTRON, Inc. Manual, “How to Prevent Ball Bearing Failures.”
 Continuous lubrication provides the best lubrication results for improved bearing life. Re-greasing the motor when it is running allows a more effective, controlled result. Bearing life is improved, there is a reduced possibility of excess grease being applied and contaminating the motor internals, and the problems of the wrong grease being used, foreign matter contamination from dirty grease nipples or lubrication being missed are eliminated.


 *click for simulation.


